
Arch Linux is an excellent lightweight GNU/Linux distribution. It’s very well documented, and it’s fast. Even if you are not a die-hard Linux geek, you can learn quite a bit about GNU/Linux from it, as it’s often used as a reference distro. This is tutorial on how to install Arch Linux on your laptop or PC.
This tutorial is intended for computers with BIOS firmware installed. To check if you are using legacy BIOS or UEFI, see you motherboard tech specs, or press F12/F2/ESC while booting to enter firmware settings. You will see what is installed.
As I assume you have BIOS, I will create MBR partitioning table. This is a standard for BIOS systems. For UEFI you should use GPT, but I will not cover it in this article.
Also, it would be easier to install Arch Linux when you have an Ethernet cable attached to your computer. However, using Wi-Fi is possible too.
How to install Arch Linux – step by step
The first step is preparation. It’s about writing Arch image to USB flash drive. You can follow steps below if you already run a GNU/Linux distribution. If you use Windows, download an image from website below and write it with any disk image writing software.
Preparation
- Backup your important data on external drive or cloud storage.
- Download disk image from archlinux.org.
- Insert USB flash drive with no files on it (otherwise, all data will be lost) into your computer.
- Open a terminal,
cdto directory where Arch Linux ISO image is downloaded. - Run
lsblkto find your USB drive/dev/path. See the picture for more info:
- Write disk image. Caution: selecting wrong block device (
sda/sdb/…) will cause horrible data erase on your system! So, the command (remember to replacesdbwith your device if needed):dd if=archlinux-*-x86_64.iso of=/dev/sdb bs=4M status=progress
It writes Arch iso tosdbblock device with progress report and block size of four megabytes. - After this, run
eject /dev/sdband unplug the USB stick. - Power off your computer.
Booting
- Insert the USB flash drive and power on the computer. While booting, press F12/F2/ESC or whatever to enter BIOS settings.
- Select your USB stick as boot device.
- Boot. You should see this (a bootloader):
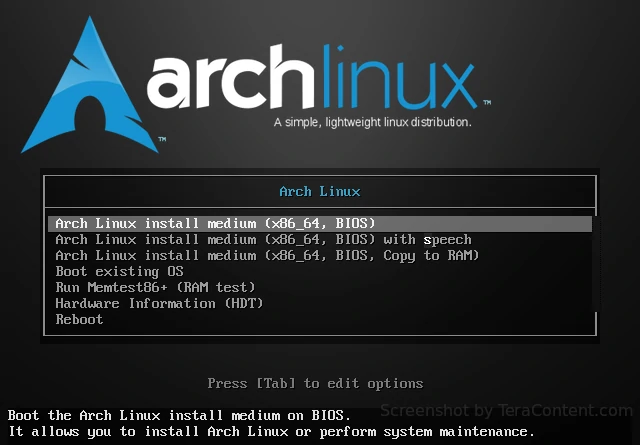
Press Enter in bootloader. After, you should seeroot@archisoshell prompt.
Installation tutorial
Connect to the network
If you use an Ethernet cable, check the network now: curl archlinux.org
You should see some HTML code and “301 Moved Permanently”. The reason for this is redirect to HTTPS version of archlinux.org, but you don’t need it. If you see it, the network is fine, move on.
If not, run iwctl. You should see “[iwd]#” prompt. You can use help command to get help, but usually you should do the following:
device list
station wlan0 connect access_point
…where wlan0 is the device name obtained by device list and access_point is your home WIFI access point name. Press Ctrl+D to exit iwd.
Partition the disk
You can use cfdisk, a terminal user interface to fdisk. However, I will guide how to use fdisk because it is scriptable and more advanced.

Run fdisk /dev/sda, where sda is name of your hard drive, where you want Arch to be installed. If you do this on virtual machine, use vda instead. Run fdisk -l to be sure.
Use the m command to get help. Also, you can use picture on the right for reference. I highlighted useful commands with yellow color.
Press ENTER after every command. The command sequence you should run looks like this:
o— create new MBR partition table.n,p,ENTERtwo times,+8G— create a swap partition (you can adjust the size).n,p,ENTERthree times — create root partition.t,1,swap— mark first partition as swap.a,2— mark root partition as bootable.w— write changes and quit.
Done! You can use fdisk -l /dev/sda to verify partition table.
Create filesystems
Create swap and root filesystem, enable swap with swapon and mount filesystem:
mkswap /dev/sda1
mkfs.ext4 /dev/sda2
swapon /dev/sda1
mount /dev/sda2 /mnt
Install base system
Use pacstrap tool to install Arch Linux packages and package groups to the system by mount path. In our case, it is /mnt:
pacstrap /mnt linux linux-firmware base base-devel syslinux nano sudo networkmanager xdg-user-dirs man man-db
You might want to install linux-lts kernel instead of linux if you don’t want to update it too often. If you use Wi-Fi, you should install something like wpa_supplicant.
Configuring the system
At this step, you have your system installed in /mnt directory (on /dev/sda2). It’s time to configure it!
Generate filesystem table — fstab
Arch Linux installation medium has a builtin script for generating /etc/fstab file — genfstab. Here is how to use it:
genfstab -U /mnt /mnt/etc/fstab
Change root to new system
Now, you can change root directory to your newly installed system. To do this, mount and chroot are used. In Arch Linux, you can use arch-chroot utility:
arch-chroot /mnt
Set up users
- Change root password — run
passwd - Add new non-root user. I will call him John:
useradd -m john - Change
johnpassword:passwd john - Add “wheel” group for superusers:
EDITOR=nano visudo
Navigate to the line# %wheel ALL=(ALL) ALLand uncomment it — erase#at start. - Add John to sudoers:
gpasswd -a john wheel - Press Ctrl+X, than y and
ENTERto exitnano.
Configure the clock
- Set the timezone:
ln -sf /usr/share/zoneinfo/America/New_York /etc/localtime
Remember to replace America/New_York with your location in format Continent/City.
You’ve just created a symbolic link/etc/localtimewhich points to your timezone file. - Enable NTP synchronization:
timedatectl set-ntp true - Set the Hardware Clock from System Clock: hwclock -w
Set the hostname
Let’s call our computer “archcomp” (you can choose whatever you want). Write /etc/hostname file:
echo archcomp > /etc/hostname
Then alter the contents of /etc/hosts. You can use nano editor for this purpose. But you can also execute this tricky Bash command:
cat << EOF > /etc/hosts
127.0.0.1    localhost
::1          localhost
127.0.1.1    archcomp
EOF
Remember to replace archcomp with your hostname.
Enable Network manager
Use systemctl to make Network Manager startup automatically every system boot.
systemctl enable NetworkManager
Install the Syslinux bootloader
There is a Syslinux autoinstaller, you can use it now:
syslinux-install_update -iam
By default, Syslinux writes sda3 as your root partition. Replace it to your partition with sed tool:
sed -i "s/sda3/sda2/g" /boot/syslinux/syslinux.cfg
…where sda2 is your root partition.
Exit & reboot
- Exit the chroot:
exit. - Unmount the filesystem (recursively):
umount -R /mnt - Turn off swap:
swapoff -a - Finally,
reboot.
I hope you did everything right. In this case you should see “archcomp login” after reboot.
Conclusion
Next thing you should do is to install Graphical User Interface. To do this, install X server, then install a Window Manager (something like i3wm) or a Desktop Manager (KDE/XFCE/Gnome etc.). See those post-installation steps in next articles. Good luck!