
You’ve rented a server or VPS/VDS. Your fresh new remote machine is here and you want to login right now. So do hackers and bots. But how to secure your server? Let’s figure out.
Prerequisite: trustworthy hosting provider
First, ensure that your server is hosted by a reliable server provider. If you use shared hosting, migrate to secure cloud provider immediately. If you already use secure hosting you can skip this step.
Do not use free hosting
Free hosting comes with an enormous set of disadvantages. If you run your site on a free host, you become a marketing product audience. You are being served advertisements by your provider and the owner of the website, your free hosting provider. It means that your website visitors have to see unwanted ads. Do you really want to show ads to your visitors that don’t bring you profit?
Also, free hosting providers are often insecure and sometimes experience data breaches. It is clear that you want to buy a VPS/VDS so that you can configure it to your needs.
Avoid using shared hosting
You should not use a shared hosting service because you are sharing server with many other websites. Many of them don’t care about security. It means that you can’t ensure that they have not installed exploits on your server, or injected any additional unwanted scripts. If your host system administrator makes a mistake that compromises security, your site and data get vulnerable.
It’s better to choose a server that is not shared with anyone. If you use a VPS/VDS, it’s enough to use firewall that will protect your Linux server from attacks.
What hosting provider should you choose?
You need a server provider who provides the hardware, software and network which are stable and secure, and which also has strong security policies in place. Keeping those requirements in mind but looking for reasonable price, we compared dozens of hosting providers.
DigitalOcean turned out to meet all of the requirements: it is simple yet secure. Get free $100 credit for cloud hosting by registering with our referral link!
When you have already selected secure server provider and rented a server instance, follow steps below to protect it.
Setup SSH key-based authentication
A common mistake among many system administrators is to use password-based authentication for a server. It is not really secure — even a new server is continuously attacked by dozens of bots:

As you can see from the image above, the SSH daemon blocks a lot of bots, thereby wastes system resources and increases server load. If you use passwords, you have a risk of joining a botnet, which means giving your server in someones hands.
Use SSH public and private key instead. To switch from passwords to SSH keys, create your key pair. The key pair consists of a private and a public key. The private key is stored on your computer (on Unix systems, it is ~/.ssh/id_rsa). The public key is stored on the server. You can consider the public key as a door lock and a private key as …you guessed it — a key!
After generating a key pair, upload the public key (~/.ssh/id_rsa.pub) to your server. Usually, it is done via admin panel of the hosting provider. It is recommend to select this authentication method while creating a server.
When done, check that you can connect to the server with a SSH client. On Unix (Linux, BSD) systems, use ssh from OpenSSH for that.
Optional: adding server IP to /etc/hosts
If you have no domain or use a reverse proxy it may be inconvenient to type your server IP every time you want to connect. There is an easy solution to this problem: just add the server IP to /etc/hosts file. Add the following line to /etc/hosts file:
172.16.254.3 my-server
…where 172.16.254.3 is the IP address of the server and my-server is your server desired name. After saving the file you can use my-server instead of IP when connecting to it!
Update, upgrade, reboot
To keep you system secure, do regular updates. To update a Debian/Ubuntu server, refresh package list:
sudo apt update
Next, install new packages (upgrade):
sudo apt upgrade
If the package manager reported that updates are installed, don’t hesitate to reboot the server via sudo reboot command.
Change SSH daemon port
Remember the screenshot above? All those bots try to brute-force login and password on port 22. If you change the port number which SSH daemon listens on, you will prevent most of those attacks. Of course, most aggressive bots still reach non-standard port numbers. But you should not worry about them, if you use SSH keys instead of passwords.
To change SSH port edit /etc/ssh/sshd_config on remote server. Find “Port” row and set it to a five-digit value, like 12345. Restart SSH with systemctl restart ssh. Next time you want to connect specify port number like this: ssh -p12345 user@serverip.
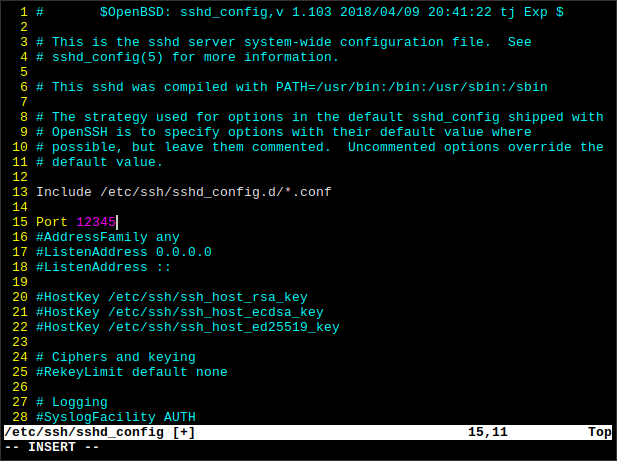
sshd_config in VimYou can create a bash alias for connecting with custom port number. By the way, there is no need to specify user in the ssh command if it matches your home computer username. But you need to add another user for that.
Add non-root user for security
Doing everything as root with full privileges is insecure and dangerous. Here is why:
- If the server runs a vulnerable web application then compromised web app means compromised server — you certainly do not want that!
- If you by accident do something wrong as non-root user, the negative impact might be not as severe as it could be.
To fix flaws listed above add a new user via useradd. Let’s call it Bob (replace with your username). The -m flags tells the program to create a home directory for Bob. Also, we specify shell to Bash. If we don’t, it would be set to sh, which has less capabilities than Bash.
useradd -m -s /bin/bash bob
Now delete password for bob — you are going to use SSH keys which means there is no need for a password:
passwd -d bob
Install sudo if not installed via apt install sudo. Run visudo and find the line where it define the %sudo group. Replace it with the following to allow passwordless sudo access:
%sudo ALL=(ALL:ALL) NOPASSWD:ALL
Save the file and exit. Add Bob to sudoers to give the ability to issue sudo commands (run as superuser).
gpasswd -a bob sudo
Copy SSH key from root to Bob home directory:
cp -r /root/.ssh /home/bob/
Change access mode of the Bob’s home directory to him recursively:
chown -R bob /home/bob/
Now try to login into the server as Bob. If you log on successfully, move on to the next step.
Disable root login from SSH
If you have a non-root account with superuser privileges, you can forbid logging in to server as root. You will not need it, therefore no one will. Edit /etc/ssh/sshd_config again. This time, find “PermitRootLogin” field and set it to “no”. Next, add your username (in our case, bob) to “AllowUsers” field:
PermitRootLogin no
AllowUsers bob
Now, restart SSH with sudo systemctl restart ssh. Don’t close this SSH session, just in case. Try logging in as Bob in a separate session. If it works then you can close the root session.
Install and configure the UFW firewall
One of the most important steps of securing a server is installing and configuring the firewall. A firewall is a program that controls incoming and outgoing traffic to prevent unwanted connections.
Check if UFW is already installed
Sometimes UFW is preinstalled on server images. To check if it is already installed, run the command below:
sudo ufw status
If you see the firewall rules, you can skip the next step. Otherwise, the shell will print “bash: ufw: command not found“, which means you should proceed to the UFW installation.
Install UFW on Debian/Ubuntu server
To install the UFW (Uncomplicated Firewall) on Debian-based Linux distributions including Ubuntu run the following:
sudo apt update
sudo apt install ufw
If you don’t need IPv6, set “IPV6” to “no” on /etc/default/ufw (see this option at the top). Add it to system startup:
sudo systemctl enable ufw
Configure the firewall
After you installed the firewall, allow connecting to the SSH port:
sudo ufw allow 12345
sudo ufw enable
sudo ufw reload
If you run a web server, allow connection to port 80 and 443 as well. But if you use Cloudflare as a reverse proxy provider, allow only their IP addresses instead.
Optional: allow only Cloudflare IP’s
Download Cloudflare server IP’s to temporary file:
curl -s 'https://www.cloudflare.com/ips-v4' -o /tmp/cf_ips
echo '' >> /tmp/cf_ips
curl -s 'https://www.cloudflare.com/ips-v6' >> /tmp/cf_ips
Next use this Bash “for” loop to iterate over /tmp/cf_ips and allow them (I based it on this script):
for cfip in `cat /tmp/cf_ips`; do
sudo ufw allow proto tcp from $cfip comment 'Cloudflare IP';
done
Done! Now run sudo ufw reload. Now, everything should work properly and the server is secured.